How to set up the Gift Message block
In short
The Gift Message block adds an "Add a gift message" link to checkout that opens a message box. When the buyer clicks Add Message, the text is saved to the order, as the giftMessage attribute unless you change it. Add the block, adjust the Title, Description and Button Text if you like, save, and place it in the checkout editor.
Category
Custom Fields
Plan
Advanced & Deluxe
Where it shows
Shopify checkout
Saves to order
Attribute or metafield
✓ Applies to
- Advanced and Deluxe plans
- Shopify Plus checkout
- Any checkout position: body, after the header, or around the delivery address
✕ Doesn't apply to
- Printing the message or hiding prices on packing slips. Edit your packing slip template for that
- Making a gift message mandatory
What the Gift Message block does
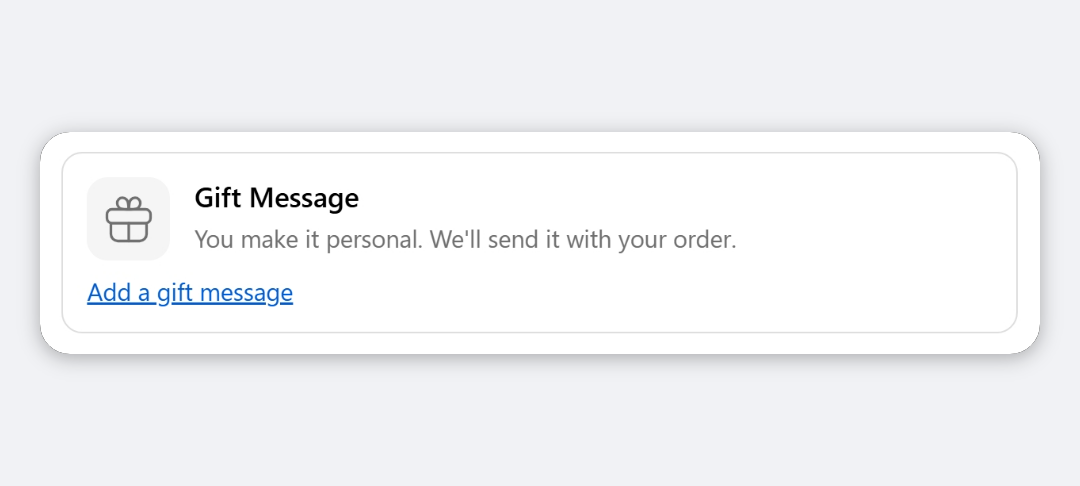
The block shows a bordered card with a gift icon, your title and a short description, plus a link (Add a gift message by default). Clicking the link opens a message box with a character counter and two buttons, Add Message and Cancel. After the buyer adds a message, the card shows it in quotes with Edit Message and Delete Message links. The message is saved to the cart and carries through to the order.
When to use it
- Offer a gift note without adding a large text box to every checkout.
- Pass a message to your packing team, who can copy it onto a card.
- Feed a print or fulfilment integration that reads order attributes.
Before you start
- Decide where your team will read the message. It’s saved as the
giftMessageattribute by default. If your packing slip or fulfilment app needs a different name, change it in step 4.
Set it up
- In Checkout Ninja, go to Blocks and click Create New Block. Then click Start Fresh, or open an existing block you want to add it to.
- Click Add block and choose Gift Message.
- (Optional) Change the Title, Description, Button Text and Maximum Characters.
- (Optional) Under Where to store the value, change Name of the attribute from
giftMessage, or choose Metafield and enter a Namespace and Key. - Click Done. Check that Status is Active, then click Save and copy the Block ID.
- Click Open Checkout Editor. Add the Custom Block app block where you want the gift option, paste the Block ID and save.
Settings reference
| Setting | What it does | Default |
|---|---|---|
| Title | Heading on the card, and the label of the message box. | Gift Message |
| Description | Line under the title, shown until a message is added. | You make it personal. We’ll send it with your order. |
| Button Text | Link that opens the message box. | Add a gift message |
| Textarea Placeholder | Not shown in checkout in the current version. | Message (No Special Characters) |
| Maximum Characters | Number shown in the counter under the box. It isn’t enforced. | 250 |
| Required | Not applied in checkout in the current version. The message is always optional. | No |
Where to store the value
| Setting | What it does | Default |
|---|---|---|
| Attribute → Name of the attribute | Saves the message as a cart attribute. It appears on the order under Additional details. | giftMessage |
| Metafield → Namespace and Key | Saves the message as a cart metafield, written as namespace.key. | None |
Verify it worked
- Open your checkout. The card shows your title, description and link.
- Click the link, type a message and click Add Message. The card now shows your message in quotes.
- Place a test order.
- Open the order in Orders. The message is under Additional details, as
giftMessageunless you changed the name. - Negative check: in a new checkout, add a message, then click Delete Message. The saved message is cleared.
Limitations
- Shopify Plus only for placement in the checkout steps. That’s a Shopify rule for all checkout apps.
- The message is only saved when the buyer clicks Add Message or Update Message.
- Maximum Characters, Textarea Placeholder and Required don’t change checkout behaviour in the current version.
- The block doesn’t print the message or hide prices on packing slips. Edit your packing slip template in Shopify for that.
- The button labels Add Message, Update Message, Cancel, Edit Message and Delete Message are fixed in English.
Troubleshooting
The buyer typed a message but it isn’t on the order. They didn’t click Add Message. Typing alone doesn’t save. Mention it in the Description, for example “Click Add Message to save”.
The message is on the order under an unexpected name.
Blocks created with the default setting save to giftMessage. If Name of the attribute was cleared, the block saves to gift_message instead. Check both under Additional details, then set the name you want.
Messages are longer than my limit. Maximum Characters only sets the counter. Ask buyers to keep to the limit in the Description, and trim messages before printing.
Want to see this block in a live checkout first? See examples and use cases →
Frequently asked
Where do I find the gift message on the order? +
Open the order in Shopify admin and look under Additional details. By default it's listed as giftMessage, unless you changed Where to store the value.
Is the message saved as the buyer types? +
No. It's saved when the buyer clicks Add Message (or Update Message). If they type and continue without clicking it, nothing is saved.
Does Maximum Characters stop longer messages? +
No. It sets the counter shown under the box, for example 12/250, but the box doesn't stop the buyer typing past it.
Will the message print on my packing slip? +
Only if your packing slip template prints order attributes. Checkout Ninja saves the message to the order; it doesn't change your packing slip.