How to set up the Shipping Protection block
In short
The Shipping Protection block adds an opt-in checkbox to checkout that puts a protection product of your choice into the cart. Create a product for the protection fee first, then add the Shipping Protection block, select that product under Protection Product, save, and place the block in the checkout editor. The price shown comes from the product.
Category
Conversion Boosters
Plan
Deluxe only
Where it shows
Shopify checkout
Setup
No code, ~5 minutes
✓ Applies to
- Deluxe plan only (not on Advanced)
- Shopify Plus checkout
- Any checkout position: body, after the header, or around the delivery address
✕ Doesn't apply to
- Filing or paying claims. The block sells a product; you handle claims yourself
- Thank-you and order status pages
What the Shipping Protection block does
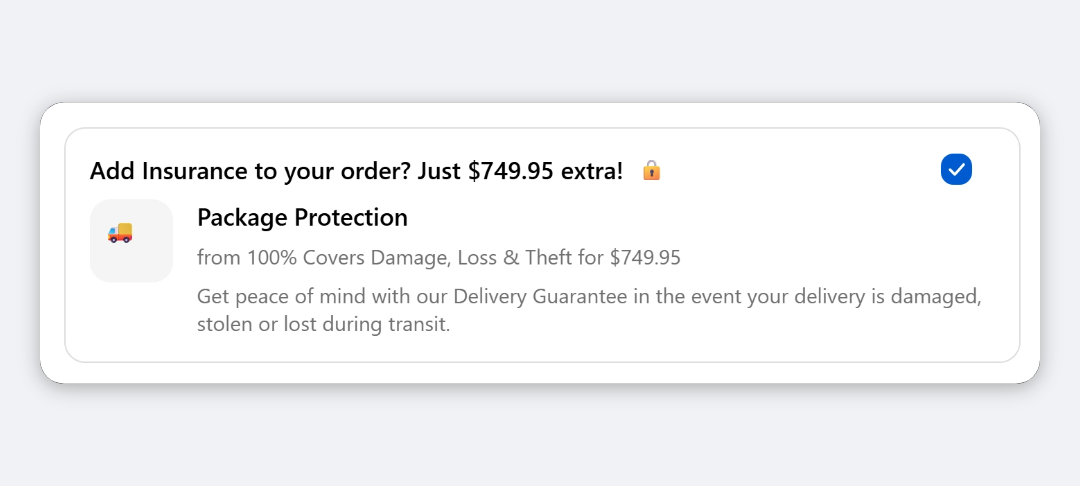
The block shows a card in checkout with a checkbox, a short pitch and a price, for example “Package Protection: 100% Covers Damage, Loss & Theft for $2.95”. When the buyer ticks it, Checkout Ninja adds your protection product to the cart. When they untick it, the product is removed. The fee appears as a normal line in the order, so it reports and refunds like any other product.
When to use it
- Offer opt-in package protection without an outside insurance app taking a share of each sale.
- Cover high-value or fragile orders, and set expectations about loss and damage before the buyer pays.
- Add a flat handling or “green delivery” fee as an optional line item. Any product works, not only insurance.
Before you start
- Create the protection product in Products in your Shopify admin. Set its price to your fee.
- Make it available on the Online Store sales channel.
- Set it so it doesn’t track inventory, or keep it in stock.
- Consider turning off This is a physical product so it doesn’t affect shipping weight.
- The Deluxe plan. Shipping Protection isn’t included in Advanced. Choosing it on Advanced opens the Upgrade The Plan window.
Set it up
- In Checkout Ninja, go to Blocks and click Create New Block. Then click Start Fresh, or open an existing block you want to add it to.
- Click Add block and choose Shipping Protection.
- Under Protection Product, select the product you created.
- Under Content Settings, keep Default Content, or choose Custom Content to write your own header, title, description and details.
- Put
{price}anywhere in the header to show the product’s price.
- Put
- (Optional) Under Appearance Settings, choose Custom Appearance to set your own icon, a compact or single-row layout, and which side the checkbox sits on.
- (Optional) Under Custom Line Item Attributes, add key/value pairs to tag the protection line, for example
_protection_type=shipping. - Click Done. Check that Status is Active, then click Save and copy the Block ID.
- Click Open Checkout Editor. Add the Custom Block app block where you want the offer, usually just before or after the delivery address, or near the payment step. Paste the Block ID and save.
Want to offer protection only on orders above a certain value? Turn on Enable conditional block visibility and add a Cart Total condition. See every condition.
Settings reference
Content Settings (Custom Content)
| Setting | What it does | Default |
|---|---|---|
| Header Text | Main line of the card. {price} is replaced with the protection product’s price. | Add Insurance to your order? Just {price} extra! |
| Protection Title | Name of the protection service. | Package Protection |
| Protection Description | Short line on what’s covered. | 100% Covers Damage, Loss & Theft |
| Detailed Information | Longer explanation (up to 3 lines). | Get peace of mind with our Delivery Guarantee… |
| ”From” Label | Connector word shown before the description. Edit it to translate. | from |
| ”For” Label | Connector word shown before the price. Edit it to translate. | for |
| Show Lock Icon | Shows a lock icon next to the header. | On |
Protection Product
| Setting | What it does |
|---|---|
| Protection Product | The product added to the cart when the buyer opts in. Its price is the fee shown. Required. The block stays hidden until it’s set. |
Appearance Settings (Custom Appearance)
| Setting | What it does | Default |
|---|---|---|
| Custom Icon URL | Image shown on the card. Use an https URL. | A 🚚 truck icon |
| Icon Size | Small (32px), Medium (48px) or Large (64px). | Medium |
| Layout Style | Compact (2 rows) or Expanded (single row). | Compact |
| Checkbox Position | Right or left side of the card. | Right |
Custom Line Item Attributes
A list of Attribute Key and Attribute Value pairs. They’re added to the protection line in the cart and carried through to the order. Start a key with _ to hide it from the buyer.
Styling Options (Custom Styling)
| Setting | Options | Default |
|---|---|---|
| Container Background | Base, Subdued, Transparent | Base |
| Container Border | None, Base, Dotted | Base |
| Border Radius | None, Small, Base, Large | Base |
| Container Padding | None to Extra Loose | Base |
| Element Spacing | Extra Tight to Extra Loose | Base |
| Header Text Appearance | Base, Accent, Subdued, Success, Warning, Critical, Info, Decorative | Base |
| Price Text Appearance | Same options as header | Accent |
Verify it worked
- Open your checkout with any product in the cart. The protection card shows your text and the product’s price.
- Tick the checkbox. The protection product appears in the order summary and the total goes up by its price.
- Untick it. The line is removed.
- Place a test order with protection ticked and open it in Orders. The protection product is a line item, with your custom attributes if you set any.
Limitations
- Shopify Plus only for placement in the checkout steps. That’s a Shopify rule for all checkout apps.
- The fee is a product, not a surcharge or shipping rate. It shows as a line item, and taxes and discounts apply to it according to your product settings.
- The block shows one protection product at a fixed price. It can’t calculate a percentage of the cart. To vary the price, create several products and show a different block for each cart range with visibility conditions.
- Colours come from your checkout branding. The styling options choose from Shopify’s tones, not free hex colours.
Troubleshooting
The block doesn’t show in checkout. Check that a Protection Product is selected, and that the product is active, in stock (or not tracking inventory), and on the Online Store channel. The block hides itself if the product’s first variant can’t be sold. Then run through the general checklist.
The price shows as $0.00 or the wrong amount. The block reads the price from the product’s variant. Update the product price in Shopify. If the product has several variants, the block always uses the first variant. Give the protection product a single variant.
A discount code reduces the protection fee. Order-level discounts apply to every line, including the protection product. Restrict your discount to specific collections if you want the fee excluded.
Want to see this block in a live checkout first? See examples and use cases →
Frequently asked
Where does the shipping protection price come from? +
From the product you select as the Protection Product. Change the product's price in Shopify and the block shows the new price. {price} in the header text is replaced with it.
Does Checkout Ninja insure the shipment? +
No. The block sells a product you define. How you honour claims, whether yourself or through an insurer, is up to your store.
Can I tag the protection line item so my fulfilment app can find it? +
Yes. Use Custom Line Item Attributes to add key/value pairs, such as _protection_type = shipping, to the cart line when a buyer opts in.
Why doesn't the block show at all? +
It hides itself when no Protection Product is selected, or when that product isn't available for sale, for example when it's out of stock, a draft, or not published to the Online Store.