How to set up the Step Indicator block
In short
The Step Indicator block shows the buyer's current checkout step, for example Step 2 of 3: Shipping, with a progress bar. Steps are detected automatically. Your checkout must use the three-page layout. Add the block, set optional heading and text, then save and place it after the header in the checkout editor.
Category
Conversion Boosters
Plan
Advanced & Deluxe
Where it shows
Shopify checkout
Setup
No code, ~5 minutes
✓ Applies to
- Advanced and Deluxe plans
- Shopify Plus checkout with the three-page layout
- Any checkout position, usually after the header
✕ Doesn't apply to
- One-page checkout, where the block stays hidden
- Renaming or reordering checkout steps
- Thank-you and order status pages
What the Step Indicator block does
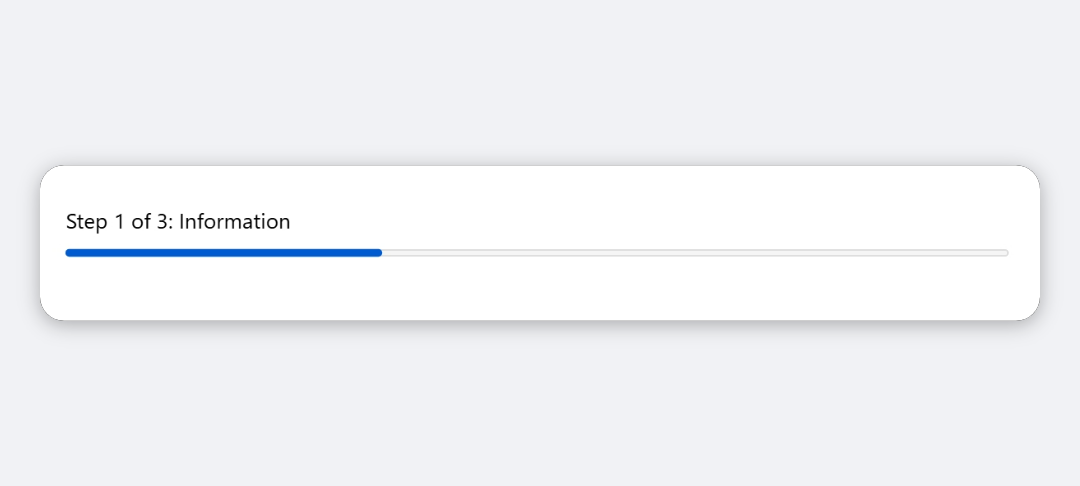
The block shows a line such as “Step 2 of 3: Shipping” and a progress bar that fills as the buyer moves through checkout. It can also show your own heading and a line of text above or below. The step count and names come from Shopify, so they match your checkout automatically.
When to use it
- Reduce drop-off on longer checkouts by showing buyers how close they are to finishing.
- Reassure first-time buyers with a short line under the steps, such as “Secure checkout. No account needed.”
- Match a branded, guided checkout where each step is clearly labelled.
Before you start
- Switch to three-page checkout. In Shopify’s checkout editor, open Settings (the gear icon at the top left), scroll to Checkout layout and choose Three-page checkout. On one-page checkout the block stays hidden.
- No extra plan needed. The block is included in both the Advanced and Deluxe plans.
Set it up
- In Checkout Ninja, go to Blocks and click Create New Block. Then click Start Fresh, or open an existing block you want to add it to.
- Click Add block and choose Step Indicator. The notice Requires a three-page checkout is a reminder of the layout setting above.
- (Optional) Under Content, add a Heading, Text above or Text below.
- (Optional) Under Appearance, choose whether to Show step name and pick a Label style and Text Alignment.
- Click Done. Check that Status is Active, then click Save and copy the Block ID.
- Click Open Checkout Editor. Add the Custom Block app block after the header, paste the Block ID and save.
Put the Custom Block in the position just after the header. It then shows at the top of the information, shipping and payment steps. All placements.
Settings reference
Content
| Setting | What it does | Default |
|---|---|---|
| Heading | Optional title above the steps. Empty hides it. | Empty |
| Text above | Optional small text above the steps. Empty hides it. | Empty |
| Text below | Optional small text below the steps. Empty hides it. | Empty |
Appearance
| Setting | What it does | Default |
|---|---|---|
| Show step name | Adds the current step’s name, as in “Step 2 of 3: Shipping”. Off shows “Step 2 of 3”. | On |
| Label style | Small, Normal or Strong text for the step line. | Small |
| Text Alignment | Left, Center or Right. | Center |
Container
| Setting | Options | Default |
|---|---|---|
| Background | Transparent, Base, Subdued | Transparent |
| Border | None, Base, Dotted | None |
| Border radius | None, Small, Base, Large | Base |
| Padding | None, Tight, Base, Loose | Base |
| Element spacing | Tight, Base, Loose | Base |
Verify it worked
- Open your checkout and go to the first step. The block shows “Step 1 of 3” with the step name.
- Continue to shipping. It changes to “Step 2 of 3: Shipping” and the bar fills further.
- Continue to payment. It shows the last step.
- Negative check: switch the checkout editor to One-page checkout in a draft and preview. The block disappears.
Limitations
- Three-page checkout only. On one-page checkout there are no separate steps, so the block is hidden.
- Shopify Plus only for placement in the checkout steps. That’s a Shopify rule for all checkout apps.
- The number and names of steps come from Shopify. You can’t rename, add or skip steps.
- The “Step … of …” wording is fixed in English. Only your heading and text can be changed or translated.
- The bar uses your checkout’s default progress colour.
Troubleshooting
The block doesn’t show at all. Your checkout most likely uses one-page layout. See step indicator not showing.
It shows on some steps but not others. The Custom Block is placed in a position that only exists on some steps, such as around the delivery address. Move it to the position after the header.
Want to see this block in a live checkout first? See examples and use cases →
Frequently asked
Does the Step Indicator work on one-page checkout? +
No. One-page checkout has no separate steps, so the block stays hidden. Switch to three-page checkout in the checkout editor's settings.
Do I need to set up the steps? +
No. The block reads the steps from Shopify's checkout, usually Information, Shipping and Payment, and updates as the buyer moves on.
Where should I place it? +
After the header, so it sits at the top of every step. In the checkout body it also works, but appears lower on the page.
Can I change the 'Step 2 of 3' wording? +
No. That text is fixed. You can add your own heading and text above or below it, and turn off the step name.